|  |  |  | |
| | Ilmu Komputer & Software Gratis | | |
| | | | |
| | | | |
| |
|
The boot configuration data store (BCD) contains boot configuration parameters and controls how the operating system is booted for Windows Vista and later versions. Unlike Boot.ini in XP, BCD stores data in a binary format and cannot be edited with a text editor.
Visual BCD Editor is a free tool for Vista and Windows 7 operating systems, and provides a graphical user interface for command line utility BCDEdit. Once installed, it provides two main features: Startup Repair and Visual BCD Editor. The Startup Repair feature can be used to repair BCD, repair bootsector and MBR (Master Boot Record), and repair disk as well.
Key features: # Edit boot menu # Rename boot menu entries # Change boot menu timeout # Repair BCD # Backup BCD store # Import BCD store # Repair bootsector # Repair disk # Set default boot menu entry # Create new Windows XP loader # Create new Windows 7/Vista loader # Create new bootsector loader for Unix and Mac OS X
|
| |
| | |
| |
| | | | |
| | | | |
| |
|
The Windows 7 system tray (notification area) displays Network, Volume and Action Center icons by default. All three system tray icons are pretty but can't be customized without manually replacing ActionCenter.dll, pnidui.dll, and SndVolSSO.dll files.
To easily customize and replace the default system tray icons you will need a third-party tool called Windows 7 Tray Icons Changer. With this standalone utility, you can easily replace the default icons with custom ones.
How to use this tool: 1. Download and run the tool with admin rights (right-click on the tool and select Run as administrator).
2. Select the system tray icon that you want to replace with the custom one and then click Change Selected Icon button to browse to your desired image file. Please note that the custom file should be an icon (.ico file) file only. In other words, you can't use an image file. 3. Windows Explorer will be restarted to apply the change.
Note: If you are getting "A referral was returned from the server" error while launching tool utility, follow the given below steps:
# Right-click on the tool and select Properties.
# Switch to Compatibility tab. # Enable the option named Run this program as an administrator and click Apply button. Now launch tool to begin customizing system tray icons. |
| |
| | |
| |
| | | | |
| | | | |
| |
|
Most of us know about the Google Nexus One phone, an Android running phone manufactured by HTC. The phone packs-in a cool feature called Live Wallpaper. It's similar to the popular Windows DreamScene feature in Vista Ultimate edition.
Users who have used the Nexus One will agree that the Live Wallpaper is one of the best backgrounds ever made for a mobile. If you are new to this Live Wallpaper concept, please watch this video available at YouTube.
Now, if you are looking for a way to get the Nexus One live wallpaper in your Windows 7 as well, you can try the below mentioned procedure.
1. Windows 7 doesn't come with DreamScene feature. To enable the same, you need to use a third-party tool named Windows 7 DreamScene Activator. Download the utility from here and follow our how to enable DreamScene feature in Windows 7 guide to enable the missing feature in Windows 7.
2. Download Nexus One live wallpaper, and extract the Zip file contents to desktop or any other folder.
3. Right-click on the N1 Dream Scene HD (.MPG) video file and select Set as desktop background option to get the Nexus One live wallpaper in your Windows 7. |
| |
| | |
| |
| | | | |
| | | | |
| |
|
Last evening, I blogged about a site named Vloud to make your MP3/wav files sound louder. Today I will be introducing a new multimedia site that not only helps you convert & download online videos but also lets you convert video and office files online for free!
First of all, online video converting & downloading feature is great, especially when you are working on some unknown computer. Just enter the URL of the video file which you would like to convert and download to get the output format option. Select the output format and you will output files will be ready in few minutes. Mediapirate supports many popular output formats including 3g2,3gp,avi,flv,m4v,mkv,mov,mp4,mpg,psp,wmv,mp3,wav,ogg,pdf,doc,xis,ods and odp.
Also Mediapirate supports most of the portals out there like Youtube, MetaCafe, Veoh, LiveVideo so you can convert and download videos from all these sites.
Apart from online videos, Mediapirate lets you upload and convert videos and office files. What else we need from an online converter? But do note that as a free user you have few limitations like file should be less than 100MB and only 10 conversions per day.
But those limitations will not bother unless you are a hardcore media buff. Lastly, the quality of the output files was decent considering the fact that it's completely free. |
| |
| | |
| |
| | | | |
| | | | |
| |
|
We are almost addicted to messengers, may it be Yahoo, MSN, Google Talk or any other. As you know, there are many third-party messengers available which can be used to login any messenger services. So, what about online messenger services?
With Meebo everything is possible online now. That is, you need not install any messenger program offline to chat with your friends or family.
Just go to meebo.com to chat with your buddies on every major IM network in a single buddylist. Login with the IM account you already have, there's nothing to download or install, and it's totally free.
Meebo supports Yahoo!, MSN, Google Talk, Meebo, Facebook, MySpace, Aim, Icq, Jabber, Flixster services and also doesn't require any Meebo account, making you sign in to your favorite one directly. The Meebo home page displays every instant messaging service so that you can instantly start your chat by just typing the email ID and password. Once you sign in, you will get all the messenger features including smiles and video chat.
I am sure that you will be delighted in the first visit and will get addicted to it. There is also a Meebo Firefox extension available so that you directly access and chat. The Meebo Firefox Extension gives you a sidebar with a smart buddylist and visual notifications when your friends IM you. You can also drag internet links and images directly to your buddies, all while surfing the Web. |
| |
| | |
| |
| | | | |
| | | | |
| |
|
Microsoft announced its new (rebranded) search Bing recently. The new service, located at http://www.Bing.com, will begin to roll out over the coming days and will be fully deployed worldwide on Wednesday, June 3.
You can use a variety of toolbars, gadgets and applications to access Bing directly from your computer desktop or mobile device. Moreover Microsoft has also released Bing product guide that covers details about the design goals for Bing as well as interactive, step-by-step instructions for how to use the new features in everyday tasks.
Download the Bing product guide, applications and gadgets from the links below.
|
| |
| | |
| |
| | | | |
| | | | |
| |
|
Many blogs including the famous raymond.cc recently blogged about an online scanner named No Virus Thanks that scans any particular file from your system using 22 online scanners. If you are wondering about this online scanner, here is one more scanner that lets you scan your file with not less than 30 antivirus tools.
Yes, this is absolutely true! With Virus Total scanner you can scan a specific file from your system with over 30 online scanners easily. Virus Total stands out from the online scanners crowd for two reasons: 1. It scans your file with 32 scanners, 2: It lets you directly send files from your system to Virus Total scanner using the context menu itself.
This scanner is really cool if you have a very few files to scan. Unfortunately this tool doesn't let you scan your whole system. Overall, it's a good scanner as far as the performance and the included scanners are concerned.
Below is the list of well-known antivirus software that is being used in Virus Total scanner:
# Kaspersky # McAfee # Microsoft # Panda Security # PC Tools # Comodo # Eset NOD 32 # G DATA # AVG # Avira # Avast # Normon # BitDefender # Trend Micro # Virus Buster # Normon # Dr Web Download and install the Virus Total uploader, using which you can easily upload and scan your file. Thanks to Haris for this info. |
| |
| | |
| |
| | | | |
| | | | |
| |
|
Many blogs including the famous raymond.cc recently blogged about an online scanner named No Virus Thanks that scans any particular file from your system using 22 online scanners. If you are wondering about this online scanner, here is one more scanner that lets you scan your file with not less than 30 antivirus tools.
Yes, this is absolutely true! With Virus Total scanner you can scan a specific file from your system with over 30 online scanners easily. Virus Total stands out from the online scanners crowd for two reasons: 1. It scans your file with 32 scanners, 2: It lets you directly send files from your system to Virus Total scanner using the context menu itself.
This scanner is really cool if you have a very few files to scan. Unfortunately this tool doesn't let you scan your whole system. Overall, it's a good scanner as far as the performance and the included scanners are concerned.
Below is the list of well-known antivirus software that is being used in Virus Total scanner: # Kaspersky # McAfee # Microsoft # Panda Security # PC Tools # Comodo # Eset NOD 32 # G DATA # AVG # Avira # Avast # Normon # BitDefender # Trend Micro # Virus Buster # Normon # Dr Web Download and install the Virus Total uploader, using which you can easily upload and scan your file. Thanks to Haris for this info. |
| |
| | |
| |
| | | | |
| | | | |
| |
|
Keeping your system clean and safe is every essential to make sure that your data is safe. If you are looking to sweep your PC clear of all malicious attacks here is a free & effective service that helps you make your system safer.
Norton Security Check is a free service from the well-known Symantec security that tests your computer's exposure to a wide range of online threats. At first it may seem like this is just another tool. But if you are really serious about the system security you should try this tool.
The scan conducts five types of tests on your system in a short period of time and generates reports depending on that. Hacker Exposure Check: Tests your TCP ports for unauthorized Internet connections.
Windows Vulnerability Check: Tests whether basic information, including your PC's network identity, can be seen by hackers.
Trojan Horse Check: This method attempts to test for access to your computer through methods commonly used by Trojan horses.
Antivirus Product Check: Will check your antivirus.
Virus Protection Update Check: Will check if your antivirus definitions are up-to-date. |
| |
| | |
| |
| | | | |
| | | | |
| |
|
Since more and more malicious things are surfacing one the web, we always need to make sure that the file which we have downloaded is free from malicious objects.
Few months back, we had blogged about Virus Total service that scans your file with over 30 scanners. Here is another similar service called Jotti's malware scan.
Jotti's malware scan is a handy online service that lets you scan a file with over 20 well-known scanners. Jotti's malware scan is completely free and it helps you scan a file with multiple scanners including BitDefender, Clam AV, NOD 32, Kaspersky, Normon, AVG, A-Squared, Dr. Web, Avast and more. The only catch with this service is that there is a 15 MB limit per file. |
| |
| | |
| |
| | | | |
| | | | |
| |
|
We all know how tedious it is to install all applications after installing Windows. If you don't want to waste your precious time in downloading and installing applications post installing Windows 7, here is a quick solution for you.
Ninite is a free online service that allows you create a single installer for multiple free applications. For example, you can create a single installer for your Google Chrome, Firefox, Opera, Windows Live Messenger, VLC player, Picasa, and Microsoft Security Essentials. Here are the available applications at Ninite site: # Web Browsers * Google Chrome, Safari, Opera and Firefox # Messaging * Skype, Messenger, Digsby, Google Talk, Pidgin and Thunderbird # Media * VLC player, iTunes, Audacity, Hulu Desktop, AIMP, KMPlayer, & Spotify # Imaging * Paint.net, Picasa, IrfanView, XnView, & GIMP # Documents * Office 2007 Standard (trial), OpenOffice, CutePDF, Foxit Reader and Adobe Reader # Anti-virus * Microsoft Security Essentials, Avast and AVG # Runtimes * Flash, .NET, Flash, Silverlight and Java # File Sharing * uTorrent and eMule # Other * Dropbox, Evernote, BumpTop, & Google Earth # Utilities ImgBurn, CCleaner, Launchy, Revo Uninstaller, Defraggler, RealVNC, CDBurnerXP, & Recuva # Compression * WinRAR & 7-Zip
This is a great service to save your precious time. To create a single installer for multiple applications you need to follow the simple steps given below:
2. Select the applications that you want to pack into a single installer.
3. Click on the Get Installer button to start downloading the installer file. 4. Now run the just downloaded installer to start downloading procedure. Ninite will automatically install applications once the download is completed. If the selected program is already installed on your PC, it will simply skip the program.
5. Depending on your Internet connection speed, number of sleeted software and size of applications, it might take several minutes to hours to complete the procedure. Finally, note that Ninite installs all applications with default settings and it says no to browser toolbars and other junk. |
| |
| | |
| |
| | | | |
| | | | |
| |
|
Windows4all is a Silverlight based free Web OS, or cloud operating system. It is is a website that simulates an operating system inside your web browser with all essential tools that you find in a typical Windows operating system.
The taskbar and start menu of this Web OS are similar to that of the Windows Vista operating system.
This could OS offers file explorer, video player, text editor, Internet explorer, RSS reader, paint, twitter client, chat, calculator, a few games and virtual earth. Many of you will be surprised to see Virtual PC in this virtual operating system. And the good news is that it runs in your favorite Firefox browser as well (requires Silverlight installed). You can also install third-party programs developed in Silverlight.
Simply head over to Windows4all site to start exploring the cloud operating system. |
| |
| | |
| |
| | | | |
| | | | |
| |
|
For all those who have been using Windows Vista or XP, and looking for a way to test drive Windows 7 without installing, here is a cool way to experience the latest iteration of Windows client.
|
| |
| | |
| |
| | | | |
| | | | |
| |
|
Canonical is offering a new cloud based service named Ubuntu One. Ubuntu One is pretty much similar to the popular Dropbox, which enables users to store and sync files online. At present, Ubuntu One for Windows is at an early beta stage.
Though Ubuntu One for Windows is at an early beta stage with basic features, Canonical will be adding some more features before the final release. The basic 2GB storage space is completely free. So, you can test the service for free. Canonical is now accepting the beta requests. If you are new to Ubuntu One, follow the given procedure to install and setup desktop client for Windows.
First, you need to sign up for the Ubuntu One service. Head over to the new account page, enter particulars to get a confirmation email from Ubuntu One service. Enter the code provided in the email to start using the service. 1. Download the installer and double-click on the same to run the installer. We can't provide the direct link to the Ubuntu One for Windows installer as the software is in beta state. You can fill out this request form to get it. 2. Click Next button and then click Install button to start the installation. Once completed, click Finish button to launch the Ubuntu One service. 3. The Installation will create a new folder named Ubuntu One under Documents (If you can't see Ubuntu One folder under Documents, right-click on Ubuntu One icon in notification area and select Synchronize now button). From now on, all the files and folders that you add to the Ubuntu One folder will be synced(Auto sync disabled by default, enable the same in Preferences). The installation also adds a small pretty Ubuntu One icon to the notification area (system tray) which gives access to Preferences and other options. |
| |
| | |
| |
| | | | |
| | | | |
| |
|
Mozilla has released the fourth beta of its upcoming Firefox 4 browser with a few improvements and new features. Even though Firefox 4 beta 5 preview build is available, it's better to wait for the official beta release.
According to Mozilla blog, this release lets you own and control your personal Web experience by syncing your data across devices, and by helping you organize your tabs in order to juggle and prioritize your busy online life.
Firefox 4 beta 3 users can update to the latest version by navigating to Help, Check for updates option. Firefox 4 beta 4 is available in 39 languages, and can be downloaded from the below mentioned link. |
| |
| | |
| |
| | | | |
| | | | |
| |
|
Mozilla has updated the Firefox 4 to beta 5 and is available as a free download. The Firefox 4 Beta 5 brings faster graphics and new audio capabilities.
According the official blog, the latest update to Firefox 4 Beta brings super fast graphics and incredible new audio capabilities to the Web. Firefox 4 Beta now leverages hardware acceleration to improve graphics performance for Windows users and also allows, for the first time, the visualization of audio data within the browser.
Beta 4 users can upgrade to the latest version by navigating to Help menu and then clicking Check for updates option.
Along with Beta 5, Mozilla has also released the stable Firefox 3.6.9 version. So, if you are using 3.6.8 or earlier version, it's time to update your Firefox browser.
|
| |
| | |
| |
| | | | |
| | | | |
| |
|
Barely a week after the release of Beta 5, Mozilla has released Firefox Beta 6 for testing. The sixth beta of next major version of Firefox mainly fixes two issues.
According to the Mozilla blog, this is an update to resolve the following issues: # A stability issue on Windows # An issue with plugins on Mac OS X which made it difficult for users to type in some web pages, and showed white boxes over other web pages
As always, go to Help and then Check for updates option to upgrade to the latest version. You can also download the installer from the below mentioned link. |
| |
| | |
| |
| | | | |
| | | | |
| |
|
Microsoft Press has released a free book titled Moving To Microsoft Visual Studio 2010 and is available to download now. This free e-book written by Patrice Pelland, Pascal Paré, and Ken Haines is an ultimate resource for developers who have switched to the latest version of Visual Studio.
According to the authors, this 336 page book will help professional developers who are working with previous versions of Visual Studio and are looking to make the move to Visual Studio 2010 Professional. It covers the features of Visual Studio 2010 through a sample application.
It will go through a lot of exciting new language features and new versions of the most technologies without focusing on the technologies themselves. It will instead put the emphasis on how you get to those new tools and features from Visual Studio 2010. If you want to read a book where the focus is on Visual Studio 2010 and on the reasons for moving to Visual Studio 2010, this is the perfect book for you.
|
| |
| | |
| |
| | | | |
| | | | |
| |
|
Along with the release of Internet Explorer 9 beta, Microsoft has also released Internet Explorer 9 beta product guide to help users explore all the new features of the latest browser. Today, the average browser uses only 10 percent of the computing power that is available in a modern PC. Internet Explorer 9 unlocks the remaining 90 percent.
This product guide outlines new features in Internet Explorer 9 Beta, highlights the top features, and provides additional information on features specific for end users, developers, and IT professionals. Read on to learn more about how Internet Explorer 9 unlocks the Beauty of the Web.
Internet Explorer 9 beta product guide is available both in PDF and XPS formats. |
| |
| | |
| |
| | | | |
| | | | |
| |
|
Microsoft recently announced the availability of limited Beta for Office 365, a could based service that includes Office 2010 Professional Plus, Exchange Online, SharePoint Online and Lync Online. Microsoft Office 365 delivers the power of cloud productivity to businesses of all sizes, helping to save time, money and free up valued resources.
Users who want to know more about Office 365 beta service can download a bunch of documents from the Microsoft Download Center. These documents provide a detailed description of the features and functionality of Office 365 services. |
| |
| | |
| |
| | | | |
| | | | |
| |
|
The recently released Service Pack 1 Release Candidate for Windows Server 2008 R2 operating system brings two new major features: RemoteFX and Dynamic Memory. To help the Server 2008 R2 SP1 RC users, Microsoft has also made available for download Server 2008 R2 Technical Overview whitepaper and Reviewers guide.
The Technical Overview whitepaper is designed to provide technical overview of the new and improved features in Windows Server 2008 R2.
The windows Server 2008 R2 SP1 Reviewers Guide provides a technical overview of the incremental features and functions found in the Service Pack 1 Release Candidate for Windows Server 2008 R2 and Windows 7. This guide also covers Dynamic Memory and RemoteFX features in detail. |
| |
| | |
| |
| | | | |
| | | | |
| |
|
Microsoft has released an e-book named Programming Windows Phone 7 and is available to download for free.
This 1000 plus page book shows you the basics of writing applications for Windows 7 using the C# programming language with the Silverlight and XNA 2D frameworks.
This book is divided into three parts. The first part discusses basic concepts of Windows Phone 7 programming using example programs that target both Silverlight and the XNA framework. The second part of this book focuses entirely on Silverlight, and the third part on XNA 2d. |
| |
| | |
| |
| | | | |
| | | | |
| |
|
The second edition of the Microsoft Virtualization Solutions e-book is live and available as a free download. This book is intended to be read from cover to cover and will give you a good understanding of the capabilities, features, and operation of Microsoft virtualization technologies.
According to the author, Mitch Tulloch, this book is for professionals who want to learn more about the latest Microsoft virtualization technologies, including Hyper-V and Remote Desktop Services in Windows server 2008 R2, Microsoft Virtual Desktop Infrastructure, Microsoft Application Virtualization 4.5, Windows Virtual PC and Windows XP Mode.
The topics covered in this book are: # Why Virtualization? # Local Desktop Virtualization # Remote Desktop Virtualization # Cloud computing
This book is available as a free download from the below mentioned link. |
| |
| | |
| |
| | | | |
| | | | |
| |
|
A free e-book named Rev up to Excel 2010: Upgraders Guide to Excel 2010 is now available for download from Microsoft. This 250-page long e-book covers everything that you want to know about the latest Microsoft Excel 2010 program.
Chapters 1 through 11 of this e-book introduce you to all the changes in the Excel 2010 interface. While the chapter 12 introduces the new functions available in Excel 2010, chapters 13 through 20 deal with data wrangling and business intelligence.
You will learn about the vastly improved File menu and all other Excel interface goodies. You will also learn other tips and tricks by reading this free e-book. If you are upgrading from an earlier version of Excel, such as Excel 2003, you'll find this book tremendously helpful.
|
| |
| | |
| |
| | | | |
| | | | |
| |
|
Finally finished! After looking into the official Windows 7 themes site I thought of making few themes for myself and then thought of sharing with my readers. I hope you will like all the theme packs.
I have taken all the wallpapers from wallpapaerstock site, and I recommend it if you like to have cool wallpapers. So, all wallpaper credit goes to the original authors. I would like to take a small credit for composing the themes pack. How to install? 1. Download themes pack. 2. Double-click on .themepack file. Update: You can download the whole pack from the link given below: I will be adding more themes to this gallery, so stay tuned! |
| |
| | |
| |
| | | | |
| | | | |
| |
|
Windows Server 2008 R2 Enterprise Edition evaluation copy with 180-day trial VHD images are available to download from Microsoft.
Evaluating any version of Windows Server 2008 R2 software does not require entering a product key, however will require activation within 10 days. Failing to activate the evaluation will cause the licensing service to shut the machine down every hour. Once activated, the evaluation will run for 180 days. After this time, you will need to uninstall the evaluation software and reinstall a fully-licensed version of Windows Server 2008 R2.
The only catch is that this installation requires Hyper-V, you will need to have a base install of Windows Server 2008 (x64) or Windows Server 2008 R2, running Hyper-V. You can find more details about using Windows Server 2008 R2 VHD with Hyper-V here.
|
| |
| | |
| |
| | | | |
| | | | |
| |
|
Nero has upgraded its free disc burning software Nero BurnLite to v10 and is available to download now. As you may know, last year, Nero released its first free burning tool.
The latest version of Nero BurnLite free is fully compatible with Windows 7. The download size is just 31 MB and can be downloaded from the below mentioned link. Nero BurnLite 10 contains simply data burning and disc copying features for CDs and DVDs. Additional features and functionality are available with an upgrade to Nero Burning ROM or Nero Multimedia Suite 10. The free burning tool supports Data CD (ISO, UDF, ISO/UDF) and Data DVD (ISO, UDF, ISO/UDF) disc formats, and CD-R, CD-RW, DVD±R, DVD±RW, DVD-RAM, DVD±R DL media types. |
| |
| | |
| |
| | | | |
| | | | |
| |
|
Kaspersky has released the final version of Kaspersky Internet Security 2011 and Kaspersky Antivirus 2011, and are ready to download now.
Users who have been running Kaspersky Internet Security 2011 beta and Antivirus 2011 beta can now install the final version. If you have been using Kaspersky Internet Security 2010, you can install and activate it with your Kaspersky 2010 license.
As we have mentioned before, Kaspersky Internet Security 2011 packs-in a few new features such as System Watcher, Kaspersky Gadget, and Smart Installer Mode.
Here are some key features of KIS 2011: # Improved real-time proactive protection against all internet threats # New safe surf feature for unparalled online security # Protection for your digital identity at all times # Feature-rich and effective Parental Control # Application Control prevents dangerous software from harming your system # System watcher technology # Unique safe run mode for apps and websites # Use installation CD as bootable rescue disk # Easy-access desktop gadget
You can download the 30-day trial version of Kaspersky Internet Security 2011 and Antivirus 2011 using below mentioned links.
|
| |
| | |
| |
| | | | |
| | | | |
| |
|
With the upcoming release of Windows 7, the question is raised again on whether you should install the 32-bit version (x86) of the operating system or move up to 64-bit (x64). This is something that's been asked since the introduction of consumer-level processors bearing the "x64" nomenclature. It feels like just yesterday that Intel and AMD fanboys were at odds over the Athlon 64. At that time and even as recently as the introduction of Windows Vista, software and drivers for 64-bit setups were slim-pickings.
Analogous to the shift from 16 to 32-bit computing, the jump to 64-bit has been a slow one. Windows XP x64 never took off, though 64-bit versions of Vista did, thankfully. The ride was a bumpy one, but hardware manufacturers and software developers alike have finally widely adopted the 64-bit architecture - and there's no turning back now.
At this point in time, nearly everyone is on the same page about the transition. If your old video card and printer have yet to receive 64-bit compatible drivers, odds are they won't be getting any. A boatload of legacy hardware support was dropped with Windows Vista, and Windows 7 certainly won't pick it back up, regardless of which version you install.
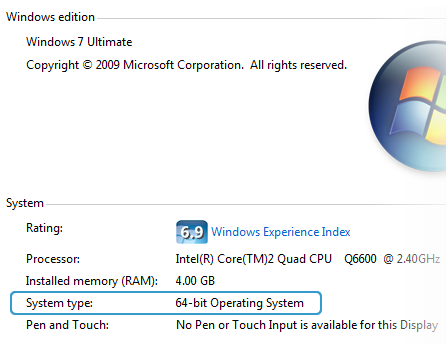 Now, you're probably wondering why 64-bit operating systems are being phased in and what benefits they deliver over their 32-bit predecessors – both legitimate questions. One of the most commonly cited differences is that the 32-bit architecture has a memory access limit of 4GB (2^32 bytes). This permits you to use about 2.75-3.5GB of RAM after IO reservations are factored in. Now, you're probably wondering why 64-bit operating systems are being phased in and what benefits they deliver over their 32-bit predecessors – both legitimate questions. One of the most commonly cited differences is that the 32-bit architecture has a memory access limit of 4GB (2^32 bytes). This permits you to use about 2.75-3.5GB of RAM after IO reservations are factored in.
On paper, the 64-bit architecture can address 16 exabytes of memory (2^64), or more than 4 billion times that of its precursor. Consumer editions of Windows Vista permit from 8GB to 128GB of physical memory to be accessed, depending on the version. Windows 7 bumps that up to 192GB with the Professional version and above.
Other benefits of running a 64-bit OS include enhanced security with hardware-backed DEP, Kernel Patch Protection and mandatory driver signing.
|
| |
| | |
| |
| | | | |
| | | | |
| |
|
Looking for a full list of emoticons & smileys for Chatroll? Here it is! All the standard emoticons are supported. To send an emoticon, simply type the emoticon text anywhere in your message and press "enter". Here's the list:
- Smile: :) =) :-)
- Grin: :D :d =d =D
- Wink: ;) ;-)
- Surprised: :o :O =o =O
- Tongue: :p :P =P :-P :-p
- Evil Grin: >:) >:D >:-) >=)
- Frown: :( =( :-(
If you want an emoticon added to Chatroll, or have ideas for new emoticons, let us know in the comments!
|
| |
| | |
| |
| | | | |
| | | | |
| |
|
Get the Chatroll Joomla Chat Module and transform your site with live interaction! Its easy and requires no coding. Follow these simple steps to add a free live chat / shoutbox to your Joomla site in 60 seconds. Lets get started!
Step 1: Click here to Create your own Chatroll
Step 2: From your Joomla administrator menu, go to Extensions -> Install/Uninstall
Step 3: Copy this URL:
and Paste it into the Install From URL tool, to install your Joomla chat module as shown below:
Step 4: Go to Extensions -> Module Manager and click on Chatroll Live Chat on the list of modules:
Step 5: Set Enabled to Yes to enable this Joomla chat module
Step 6: Copy and paste your Chatroll's Shortcode into the Shortcode module parameter box
Step 7: Click Save, and you're done!
|
| |
| | |
| |
| | | | |
| | | | |
| |
|
Looking to add a live chat or shoutbox to enhance your Drupal site? Look no more. Chatroll's got the Drupal Chat Module for you. Follow these 5 easy steps to get started:
1) Create your Chatroll »
2) Download the Chatroll Drupal Chat Module.
3) Extract the .zip file, and upload the chatroll/ folder to your Drupal installation sites/all/modules/ folder
4) Enable the module from your Drupal's Administrator -> Site Building -> Modules page
5) Copy and paste your Chatroll's Shortcode into the Chatroll Live Chat block configuration settings, from the Administrator -> Site Building -> Blocks page.
|
| |
| | |
| |
| | | | |
| | | | |
| |
|
Follow these 7 simple steps and you'll be done in 2 minutes:
1) Create your Chatroll »
2) Download and Extract the Chatroll phpBB mod: phpbb_chatroll.zip.
(Link to phpbb_chatroll.zip is accessible when you create your Chatroll.)
3) Copy phpbb_chatroll.php and chatroll.php to your phpBB includes/ subdirectory.
4) Open and edit /includes/functions.php from your phpBB installation directory:
Find:
<?php
Add after:
include($phpbb_root_path . 'includes/phpbb_chatroll.php'); Find:
'BOARD_URL'
Add after:
'CHATROLL' => chatroll_render("<shortcode>");
Replace:
<shortcode> above with your Chatroll Shortcode 4) From the Admin Control Panel (ACP) -> Styles -> Templates page, Edit your current template
5) Enter {CHATROLL} where you want your Chatroll to appear. We suggest overall_header.html or overall_footer.html.
6) Click Submit to save, and you're done!
|
| |
| | |
| |
| | | | |
| | | | |
| |
|
Looking to add a live chat or shoutbox to your vBulletin forum? Get the Chatroll vBulletin Chat! Follow these 6 simple steps to setup your vBulletin Chat in 60 seconds:
1) Create your Chatroll »
2) Download and Save the vBulletin Chat product-chatroll.xml file.
(File download is available when you create your Chatroll in Step 1.)
3) From the Admin Control Panel (ACP) menu, go to Plugins & Products -> Manage Products
4) Click [Add/Import Product] and upload product-chatroll.xml saved from Step 1).
5) From the Admin Control Panel (ACP) vBulletin Options page, select Chatroll Live Chat Settings, and click Edit
6) Copy and paste your Chatroll's Shortcode, into the vBulletin's Chatroll Shortcode input, then click Save.
From this point, simply put $chatroll[html] anywhere in your vBulletin templates to display your Chatroll. It's that easy!
|
| |
| | |
| |
| | | | |
| | | | |
| |
|
Here's the easiest way to add a free Blogger chat box widget (also known as shoutbox, chatterbox, or chat room) to your Blogspot blog. Adding a chat box widget to your blog is an easy way to build community on your site and keep your visitors coming back. It's so easy we can do it in less than a minute. We'll use Chatroll to create a chat box widget, customize it, and add it to your Blogger layout.
Here's a screenshot of a Blogger blog with a chat box embedded in the main column:

These steps are easy enough for anyone, but if you have any trouble, you can contact Chatroll Support via live chat or email. Let's get straight to it!
- Create a Chatroll live community to use for your chat box.
Go to Chatroll, enter your community's name in the "Name Your Live Community…" box and click "Create". Choose a name that fits with your blog, as this name will appear in the chat box title. Write an attractive and detailed description so that people can easily find your new Chatroll community (this will also help drive traffic to your blog).

- Copy the chat window embed code from your live community's home page.
In your new live community's home page (the page that is shown after your community has been successfully created) copy the embed code from the text box labeled 'embed'. This text box is located under the chat window, as shown below:

- Edit your Layout in Blogger.
In Blogger, click on the "Layout" tab to show your blog's layout:

- Add a new HTML/Javascript gadget.
On your blog's layout screen, click the "Add a Gadget" link to open the Add a Gadget window:

In the Add a Gadget window, scroll down and find the "HTML/Javascript" gadget. Click on the "+" icon to add it.

- Paste the Chatroll embed code into the HTML/Javascript gadget.
On the new HTML/Javascript gadget screen, enter a title for the gadget. A good title should alert your readers that this is your site's live chat. Here's the important part: Paste the chat window embed code into the Content area (this is the code you copied from Chatroll in step 2):

Finally, click "Save". The gadget should now be visible in your blog's layout.
That's it! You've just chat-enabled your Blogger or Blogspot blog! You can now use the Blogger Layout tab to drag the chat box widget wherever you want in your blog's layout.
Here's a few more tips for best results:
- Position the chat box so it appears on every page: For best results, place the chat box where it will appear on every page, so that your readers can continue their conversation even if they move from one page to another within your blog.
- Match the chat box colors and size to your blog's template: To further maximize your chat widgets's success, you'll want to customize it to match your site design. Chatroll lets you customize the position, size, and color of the chat to fit in perfectly with your blog's template. Each time you customize the chat, simply click "Edit" on the chat gadget in the Blogger Layout page and re-paste the embed code.
Thank you for reading, we hope this article has been useful for you. Feel free to contact Chatroll Support if you need any help. Enjoy your new Chatroll chat box widget!
|
| |
| | |
| |
| | | | |
| | | | |
| |
|
Chatting, Mungkin kata itu sudah ga asing lagi buat para peselancar di dunia maya .Tapi apa bisa Pasang Fasilitas Chat Di Blog ,jawabanya adalah bisa, karena dalam postingan kali ini klinik-it akan menjelaskan tentang Cara Pasang Fasilitas Chat Di Blog .Meski sudah ada shoutmix/shoutbox/buku tamu fasilitas chat setidaknya perlu dipasang di blog ,Walaupun fasilitas chat yang ada di blg hampir sama fungsinya dengan shoutmix, Tapi shoutmix cenderung digunakan hanya untuk blogwalking atau absen rutin saja.Beda dengan Fasilitas Chat Di Blog ,Fasilitas Chat Di Blog digunakan untuk chat dengan sesama user blog kita ,dan juga kita bisa berbaur untuk mererima masukan-masukan dari user blog tentang blog kita melalui fasilitas chat ini.
Fasilitas chat untuk blog yang klinik-it bahas kali ini adalah fasilitas chat dari chatroll.com ,karena gratisan.hehehe fasilitas chatnya hampir sama dengan YM atau jika sobat pernah mencoba fasilitas chat liveconnector.com fasitas chat chatroll.com hampir sama dengan fasilitas chat tersebut.nah.. jika sobat tertarik untuk Memasang Fasilitas Chat Di Blog langsung aja ikuti langkah-langkah cara Cara Pasang Fasilitas Chat Di Blog di bawah ini .
Cara Pasang Fasilitas Chat Di Blog
1.Klik http://chatroll.com/signup.
2.Setelah itu lakukan pendaftaran .jika kurang jelas lihat gambar dan intruksi di bawah .

- isi User Name dengan user name yang sobat inginkan .
- isi Password dengan password yang sobat inginkan (bukan password email).
- isi Email dengan email sobat.
- selanjutnya masukan kode verifikafi yang ada pada gambar ke dalam form Verification Code.
- Jika sudah selesai silakan klik I accept Create my account.
3.Setelah pendaftran berhasil ,selanjutnya sobat klik CREATE A CHATROLL. lihat gambar di bawah .

4.Selanjutnya isikan nama pada → Name your Chatroll. jika sudah selesai klik Continue .
5.Pada tahap selanjutnya klik HTML Website pada kategori Universal / Custom Install: ..lihat gambat .

6.Setelah itu Copy Kode HTML Chatroll milik sobat yang ada di bagian kanan atas . lihat gambar .

7.Selanjutnya Login ke blogger.
8.Klik Tata Letak .
9.Klik Tambah Gadget.
10.Klik HTML/javascript.
11.Kemudian Paste kode HTML chatroll milik sobat ke dalamnya.
12.Klik SIMPAN.
13.Hasil chatroll yang tadi di buat adalah seperti di bawah ini .
|
| |
| | |
| |
|  | |  | |

|


![Theme 1to5[5]](http://www.intowindows.com/wp-content/uploads/2009/01/theme1to551.jpg "Theme 1to5[5]")


Tidak ada komentar:
Posting Komentar